
surfresearch.com.au
steve ellingson : surfboard , 1965
steve ellingson : surfboard , 1965
| home | catalogue | history | references | appendix |
|
surfresearch.com.au
steve ellingson : surfboard , 1965 |
 |
Surfboard
IF YOU'VE wanted to try surfing but have been scared off by the fancy price tag on a commercially-built board, or if you thought that surfing was out of the question because you didn't live near the ocean, here's some good news, you can build the board shown and save about 20 percent of the cost of a commercial model, and thanks to a new technique, boat surfing, your local lake can offer the thrills of Makaha. Boat surfing isn't complicated. You lie on your surfboard and hang onto a 20-ft. towline as your skipper eases up to maximum wake speed. Then you rise to your knees annd stand up. Suddenly, you'll feel the line slacken, though you'll still be zipping along in the wake. Finally you toss the towline away and enjoy the ride until the boat runs out of of gas—or you "wipe-out." - Steve Ellington
Materials List
1 pc. 3/4'' x 4'' x 9' pine, cedar, or balsa for spine 1 slab 4''x 22'' x 8 1/2' polyurethane foam 1 gal. polyester laminating resin 2 qts. polyester coating resin for finishing 4oz. polyester hardener 3 1/2 yards 50'' wide 13oz. weight fibreglass cloth 18'' fiberglass rope, 1/4'' diameter for skeg filler 1 skeg (available at all marine supply stores) 1 4-in. paintbrush, bristles set in epoxy 50-grit sandpaper, 400-grit wet paper |
 |
 |
 |
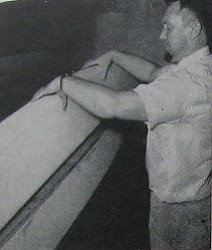
Step 1. After bandsawing the foam length-wise to produce two slabs measuring 4 x 11 in., 8 1/2 ft. long, attach paper pattern to each piece with masking tape, outline with crayon and saw to shape. Double check to make sure that the side facing spine is perfectly flat, then use polyester laminating resin to bond spine to slab. After carefully positioning spine to foam, allow at least one hour's drying time to cure. It is important to follow the manufacturer's instructions when using polyester. |
 |
Step 2. Mix one pint of laminating resin with two teaspoonsful of hardener. Using a squeegee, apply the mixture liberally along the spine so that when the second slab of polyfoam is applied a strong bond will result. If you are allergic to resins or other chemicals, it is advisable to wear either rubber or polyethylene gloves when mixing or applying the laminating resin. Even if gloves are worn, it is a worthwhile precaution to wash hands thoroughly immediately after the work is completed. |
 |
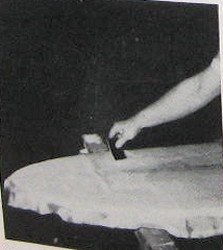
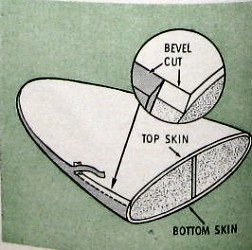
Step 3. After applying the laminating resin, carefully position the second slab of foam. As before, allow an hour for the adhesive to cure. Resins work best when applied at a temperature of about 70 degrees; try to work in a well ventilated place away from the direct rays of the sun. For safety, make certain that the laminating resin is not stored near any open flame. While the resin cures, cut out a set of templates from the center toward the nose, tail and rails (edges). Work resin into the cloth at the rails. If any resin gets on the board, wipe off immediately with acetone. Before the top skin (cloth) hardens completely, turn the board over and trim with a razor blade. A critical step after the top skin has set is to bevel the trimmed edge with file or sandpaper. Without beveling, a ridge will form when the bottom skin is applied and a weak spot will result after sanding. |
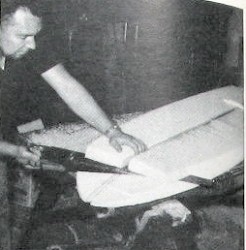 |
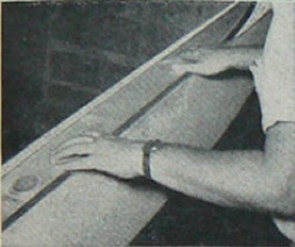
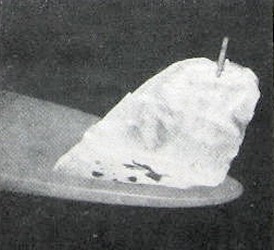
Step 4. A crosscut saw is used to cut away excess foam. Be careful to hold the saw parallel to the surface of the slab, following the spine as a guide in making the cut. After you've finished this step, the board in side view will closely resemble the finished product. Though the operation is being performed here without the aid of a helper, you may find it easier if you enlist a friend to hold the board as you saw. |
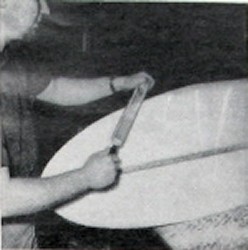 |
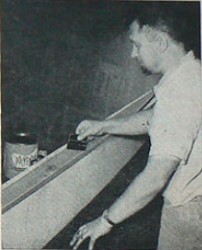
Step 5. Patience is the watchword when you are roughing out the shape of the surfboard. Errors are difficult to repair so don't try for any speed records at this stage. A coarse rasp or a Stanley Surform file should be used; fine-toothed files are not suitable for .this purpose because they tend to clog. To avoid taking off too much material at any one spot, work with even strokes along the entire edge of the board. |
 . |
Step
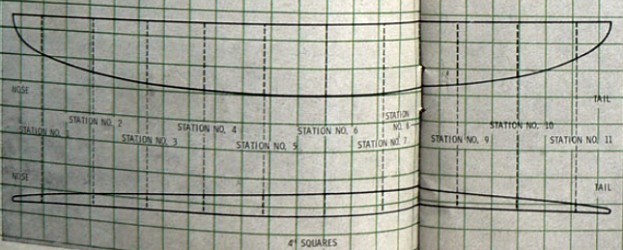
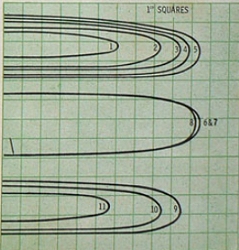
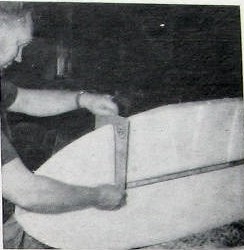
6. As you progress with the shaping, stop frequently to check contour with the appropriate template at each numbered station. The best material for the templates is '-k-in. plywood, which is rigid enough to assure accuracy. In a pinch though, you can cut the templates from V«-in. iio^-corrugated cardboard. There are ten templates in the complete set; one template is used for checking stations six and seven |
 |
Step 7 Fold the fiberglass cloth lengthwise of hardener8 stir thoi nC le"?»«»ful generous beaddowntlT5'^" and a Use the squee^Xfmer of the cl°*h, ^in, workmg" wiut S to S^ the 8 Ul d mo°erate pressure |
 |
 |
Step 8. Having sanded the bevel of the bottom skin, attach skeg 2-in. from the tail, using 3 oz. of resin and 20 drops of hardener. Hold skeg at a 90 deg. angle with masking tape until resin sets. Form fillet at the base of the skeg with resin soaked strands of fiberglass rope. Allow to harden, then lay cloth from rail to fillet and up the side of the skeg, apply resin and repeat on other side of skeg. The fiberglass cloth should extend %-in. around skeg edges. |
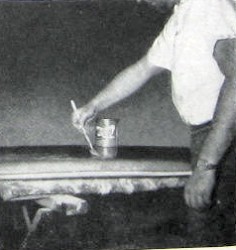 |
Step 9. Before applying the finish coat make certain that the board is thoroughly clean. Masking tape should be placed around the rails, then a mixture of one pint coating resin and three teaspoonsful of hardener is brushed over the entire board. The tape is removed before the resin sets. After the resin hardens, turn the board over and repeat the process. Be careful to position the masking tape so that each finish coat overlaps about %-in. |
 |
June 1965. Registered GPO Sydney. [Australian edition] |
| home | catalogue | history | references | appendix |